Are u looking for a simple email marketing solution in Webnode?
Do you want to put a pop-up on your website to collect emails from your visitors?
Send news to your customers through the automated MailChimp system. It’s free for up to 2,000 subscribers and 12,000 emails per month.

In this tutorial I will show you a simple email marketing solution for collecting email addresses and then sending newsletters to your subscribers.
Webnode allows you just to collect email addresses. Therefore, Webnode will allow you to collect emails, but will not allow you to sending news to your visitors.
Thats why we will use external MailChimp service, which is the most popular worldwide, and I use it myself on this website.
MailChimp is great in allowing you to collect up to 2000 email addresses in the Free version. If you don’t send more than 12,000 emails per month, you can use the service for free.
You don’t have to pay anything.
Tutorial: How to easily connect MailChimp with Webnode website
In this tutorial I want to focus mainly on 3 things – MailChimp.com registration, linking to your website and then creating a pop-up window.
I will therefore split the tutorial into 3 sections:
I will therefore split the tutorial into 3 sections:
1. Registration
2. Linking website to MailChimp
Before we start, look at the Webnode online demo with the active MailChimp service to collect email addresses. To view the preview, please click the button below..
1. How to register your website with MailChimp.com
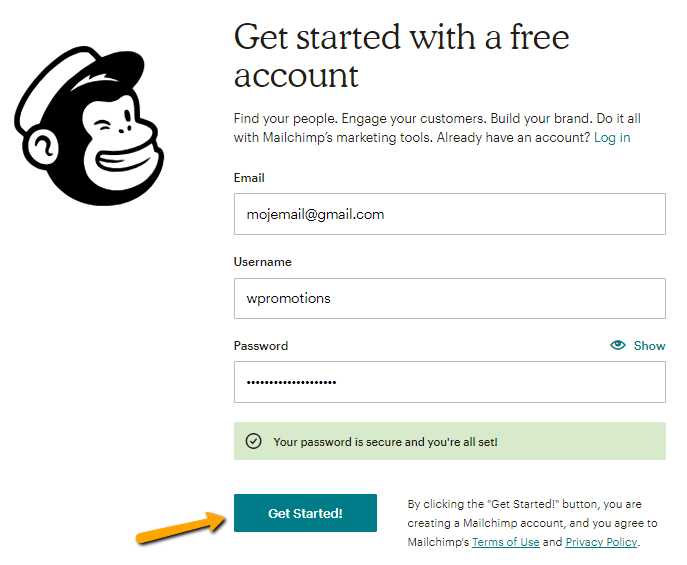
Sign up at official Mailchimp.com site: https://mailchimp.com/
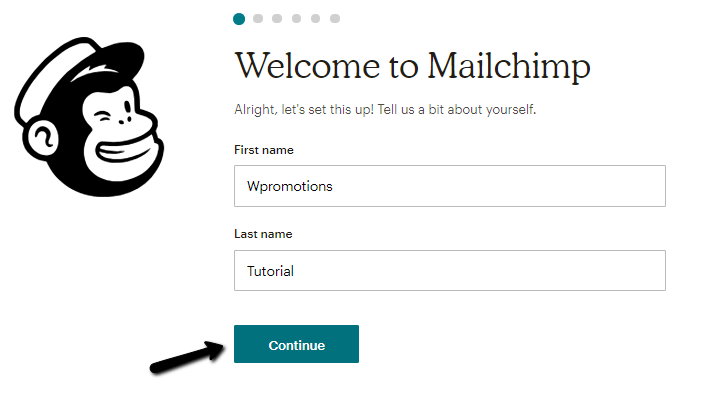
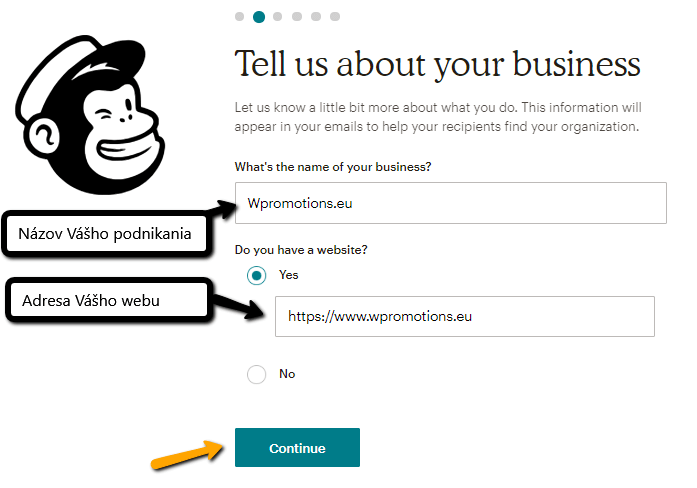
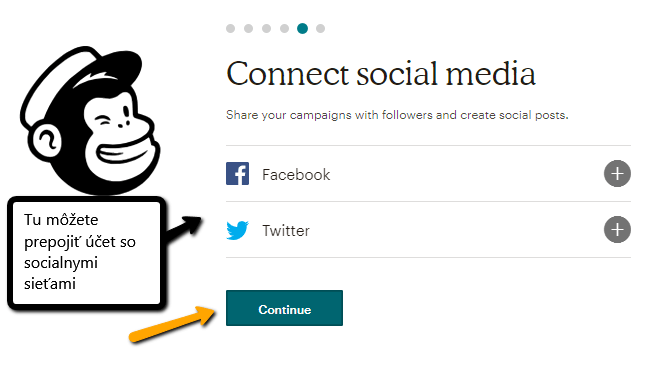
Fill in the necessary details such as email, username / password, your name, surname, business name, URL of your site and your mailing address.
Register in 7 easy steps


Click the arrow in the navigation bar and select “Integrations”

Scroll down and choose “Custom website” option
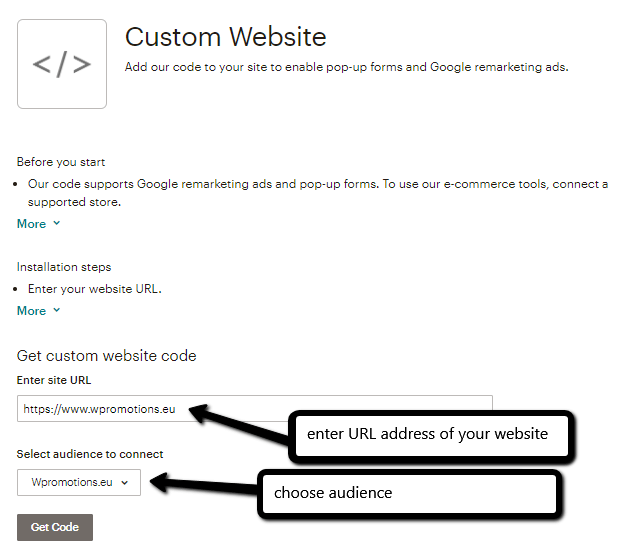
Enter the URL of your website and select the audience and cllck “Get code“
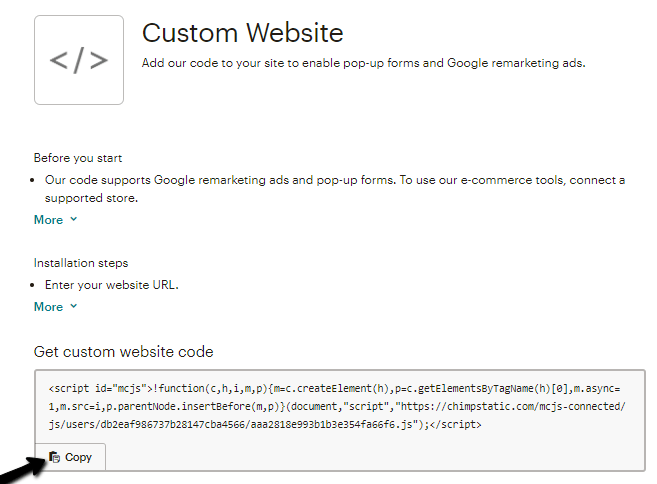
Copy the code
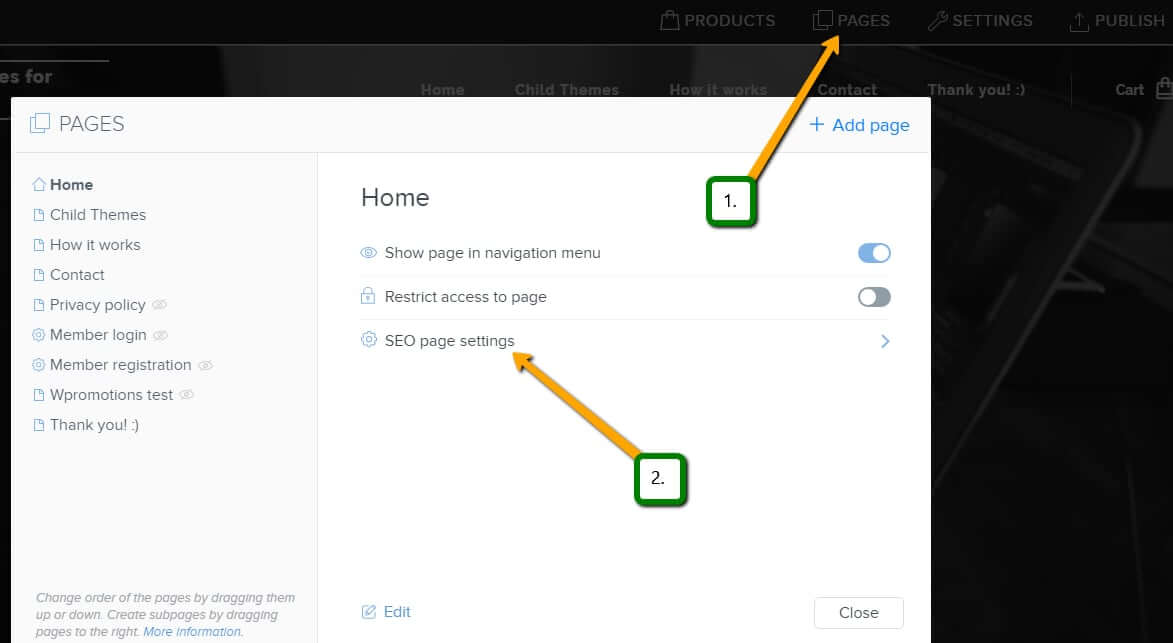
Log in to Webnode and paste the copied code on each page of the site into a section in “Pages” – “e.g. Home Page” – “SEO page setting” – “HTML website header”.
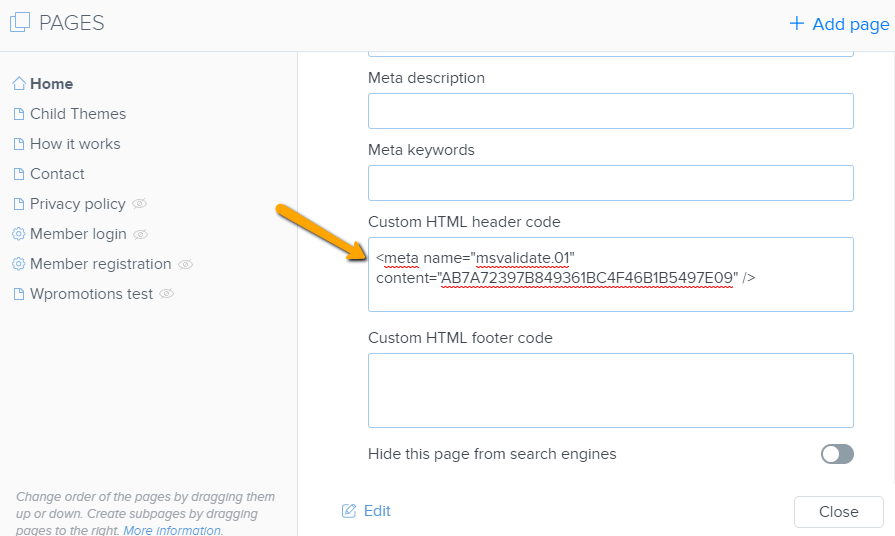
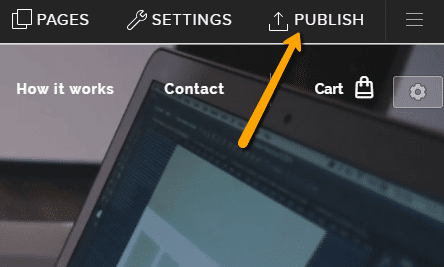
Publish changes!
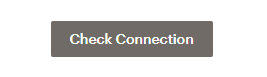
Now go to the Mailchimp site (from which you copied the code) and click the “Check connection” button below
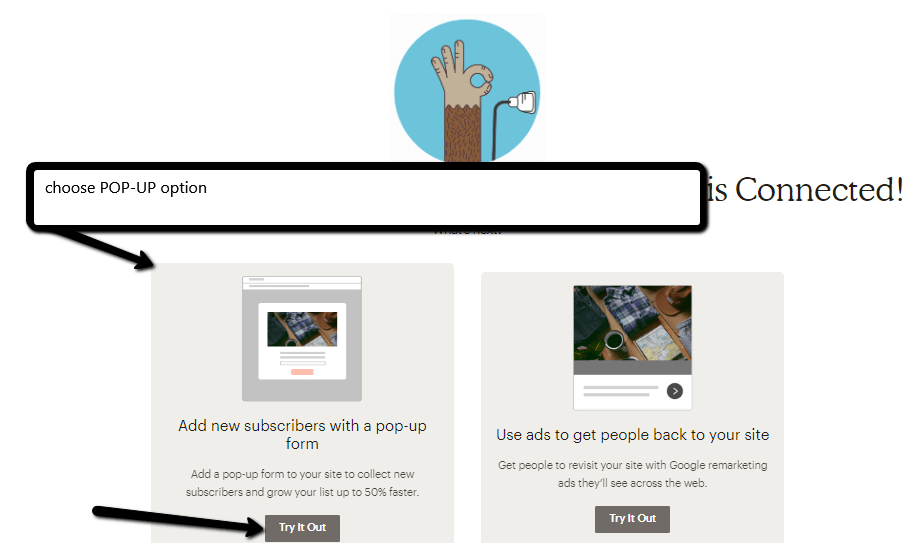
3. Creating a pop-up window (for collecting emails for free)
Well done – last step is now to create a pop-up window that will be shown to your visitors.
- Choose the appropriate logo
- Select the format
- Select “On exit” – *it means that pop-up appears when the visitor will try to close the website
Choose POP-UP option
Create your POP-UP windows easily
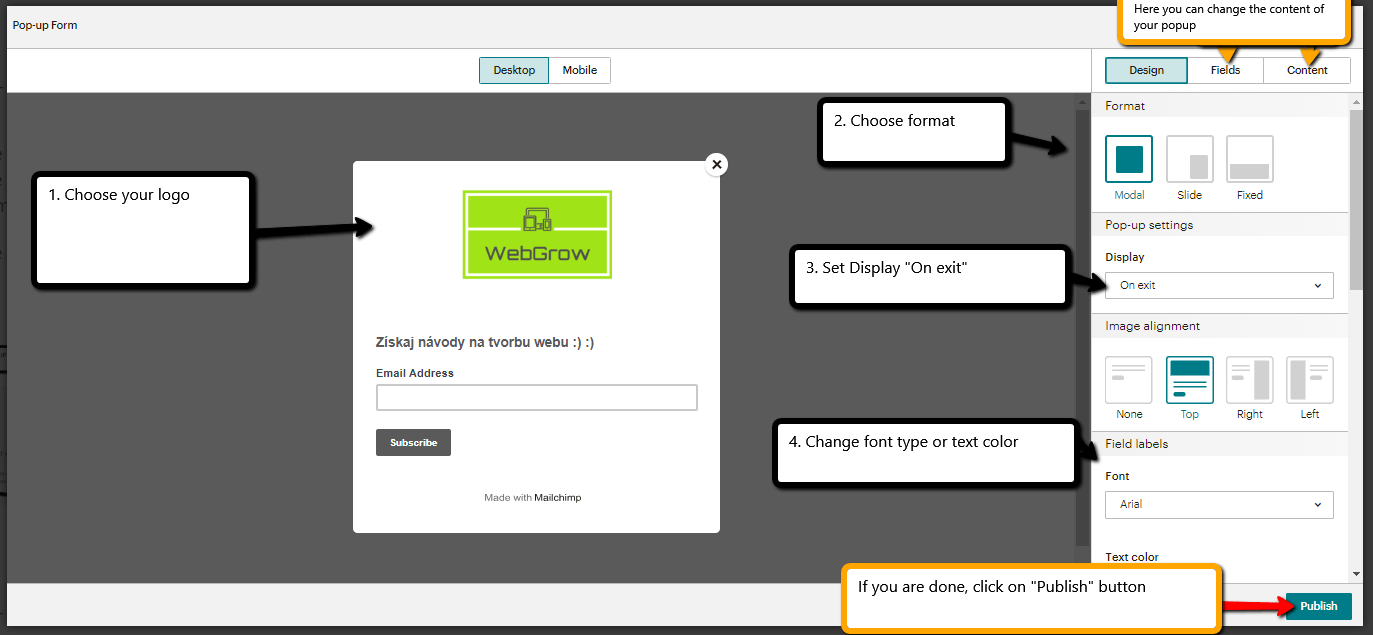
Excellent job – when your are done with the pop-up you created, click “Publish” at the bottom. And you’re done 🙂
You have successfully set up a pop-up that will “pop up” your visitors 🙂 🙂 and get your email addresses.
After you have your first subscribers, you can create first emails in Mailchimp that you send to your subscribers with one click.
More awesome tutorials
Webnode Discount Code 2026 – Get 15% Off the Premium Plan Today
Webnode Discount Code 2026: Get an Extra 15% Off Premium Plans Are you already using Webnode, or are you just thinking about creating your website? We have an up-to-date Webnode discount code that gives you 15% off selected Premium plans. This limited-time...

Webnode Review: How to create a website/e-shop for free (Webnode review 2025 +SEO TIPS)
Have you ever wanted to create your own website from scratch? Do you want to create a website or e-shop and make it visible on the Internet? Get started right now and learn how to easily create your first custom website.Creating a website with Webnode is so simple...
How to add spinning wheel to a website?
Spinning Wheel / Wheel of Fortune Spinning Wheel - Free VS Premium Spinning Wheel - Templates TUTORIAL: How to Add Spinning Wheel to a Website in Webnode? A Few Words at the End Spinning Wheel - FAQSpinning Wheel/ Wheel of FortuneIn previous articles, we explained How...
How to add an event calendar to a website?
Event Calendar Event Calendar Widget - Free VS Premium Event Calendar Templates TUTORIAL: How to Add an Event Calendar to a Website? Event Calendar- Preview A Few Words at the End Event Calender - FAQEvent CalendarIn previous articles we focused on How to add number...
How to create a website for free in 6 steps?
Websites for Free Free Websites – Templates Who are Free Websites Suitable for? Websites for Free & Own Domain Free Websites - 5 Proven Tips to Get Started TUTORIAL: How to Create a Website for Free in 6 Steps? A Few Words at the End Websites for Free -...
How to add number counter to website?
Animated Number Counter Number Counter - free VS premium Number Counter - templates TUTORIAL: How to add Number Counter to website? Number Counter - preview A few words at the end Number Counter - FAQAnimated Number CounterIn previous articles, we wrote How to link...
How to customize checkout settings in Webnode e-shop?
Buying process and Webnode e-shop What is the buying process? What can be customized/set up for checkout settings in Webnode e-shop? TUTORIAL: How to customize the checkout settings in Webnode e-shop? A few words at the end Checkout settings – FAQ Buying process...

How to create a kennel website?
Kennel website - introduction Kennel website - benefits Kennel website - must-haves Kennel website - pricing Kennel website - Webnode templates TUTORIAL: How to create a kennel website? A few words at the end Kennel website - FAQKennel website - introductionIn...
How to link social media with a website in Webnode?
Social Media & Webnode Social Feed widget - free VS premium Social Feed widget - templates TUTORIAL: How to link social media with a website? Social Feed widget - preview A few words at the end Social Feed widget - FAQSocial Media & WebnodeIn the latest...
Do you like this tutorial? Share it, please 🙂